Thursday, August 30, 2007

Hot Garlic-Buttered Asparagus

I love Asparagus.

Too bad I do not cook them more often, since finding fresh, tender asparagus at a reasonable price, is very difficult.

On my way home from work yesterday, I stopped by the store to pick up some bread, and birthday candles, and horrah! there was asparagus sitting there!

Unfortunately, because I got off work a little late yesterday, the post-work shopping crowd came and left and took all the good asparagus. =(
Shifting through the remains, I found a decent bunch, and carried the poor reject home.

Hot Garlic-Buttered Asparagus

Ingredients
- 1 small bunch of asparagus (it was pre-bunched by the store, so I am unsure how much it weighed... 0.5 pounds - 1 pound?)
- 1 tbsp of butter
- 1 garlic clove (minced)
- 1/2 tsp salt
- 1/2 tsp pepper

(salt and pepper amount can be increased or decreased based on personal preference)

Instructions
1. Wash the asparagus then cut about 0.5-1 inch off the base of each asparagus. The base is too tough to eat.
2. Peel the outer skin off the bottom of your trimmed asparagus. This skin is fibrous, but is just way too hard for my teeth to handle.
3. Boil enough water to submerge the asparagus. Boil the asparagus for about 5 minutes, or until fully cooked.


4. When the asparagus is done boiling, remove the asparagus and set aside. Dump water out.
5. Place butter in heated skillet
6. When butter is melted, toss in minced garlic and saute until golden
7. Place asparagus into skillet, until asparagus is evenly coated with butter and garlic


8. Toss in salt and pepper, and turn the asparagus until the salt and pepper is evenly distributed.
9. When asparagus is at your desired tenderness and flavor, then the asparagus is done!


Here is my asparagus!


It was quite delicious, tender, and tasty.


CLOSE-UP PAPARAZZI PHOTO!

Saturday, August 25, 2007

Steamed Live Rock Crabs

I went to the Asian supermarket "Ranch 99" today (or is it "99 Ranch"??) and I bought 2 large Live Rock Crabs !!

They looked small when Jeff and I picked the crab out of the water tank,
bigger when we stuffed the crabs into plastic bags,
and gigantic when we took the crabs home and opened up the bags!!

I was so excited over eating fresh crabs, that I went camera crazy today.
Look how gigantic these beauties are!


The crab with his giant claws, and me with my perfectly manicured claws, uh I mean, nails.

------------------------------------------------------------------------------------------------------------


The crab is bigger than my head! (He looked much smaller at the store)

------------------------------------------------------------------------------------------------------------


Jeff's crab is humongous too!
------------------------------------------------------------------------------------------------------------

Steamed Rock Crabs (with dumplings on the side)
*note*
I do not recommend boiling crabs and dumplings because all their flavors just run into the boiling water, and all you're left with is soaking wet, flavorless, crab and dumplings.
So unless you plan on drinking the boiled water,
I recommend
steaming your crabs of dumplings instead.

Ingredients:
- 2 Crabs (or as many crabs as you want that fits in your steamer)
- 1 Steamer!

Instructions:
1. Wash the crabs clean

2. Pose and take a lot of pretty photos with the crabs

3. Place crabs in the steamer. Fill steamer up with water and turn on stove on high.


hi-yah! Mortal Kombat Crabs!
(notice their interlocking claws)

------------------------------------------------------------------------------------------------------------


Mortal Kombat crabs, ready to be steamed! Hi-yah!
------------------------------------------------------------------------------------------------------------

Because I was using my 3 tiered steamer, but the crabs only occupied the middle tier,
I decided to put the top tier to use, by throwing some Asian dumplings !


------------------------------------------------------------------------------------------------------------
4. Before placing dumplings into steamer, be sure to oil the bottom of the steamer, to prevent the fragile dumpling skin from sticking to the steamer.

5. Cover the steamer!


6. After the water boils, turn the heat down to a medium, and steam for about 15-20 minutes.

7. The dumplings are ready!


8. Let's take a peek at the steaming crabs. Yum! Steaming hot!


9. Bright orange, hot, and freshly steamed crabs on a platter


How To Serve The Crabs:


The wonderful thing about eating crabs, is that they have their own natural seafoody flavor, so eating the crabs plain is always a delicious option.

Of course, crabs can always be eaten with dips and sauces such as:

Lime juice + Salt
1. Squeeze the juice out of some limes
2. Pour a pile of salt in the middle of the lime juice.
3. Serve lime juice in a dipping bowl


Hot Butter dip (not for the health conscious)
1. Melt butter on low heat over the stove.
2. Place butter in a dipping bowl
3. Dip crab meat into butter, or use a brush to lightly brush your crab with butter.


and now..... my all time favorite dip: .....
Crab Brain+Gut Dip
1. Crabs come with crab goo, located right under the shell of the crab. It's green and white and tastes so good.
2. This "crab goo" is naturally flavored, somewhat salty (from living in the salty sea!).
3. When you remove the crab shell from the body of the crab, turn the shell over and mix the goo. Dip your crab meat in this goo.
4. Not only does the crab supply his own flesh for your consuming entertainment, but the crab also supplies the dip for you too!


And here's Jeff, happily enjoying the crab, with the Crab Gut Dip!! (next to his left hand)


YUMMY!

Picking out crabs, cooking crabs, de-shelling the crab, and eating the crab, makes both: a very fun meal and a really fun afternoon activity!!

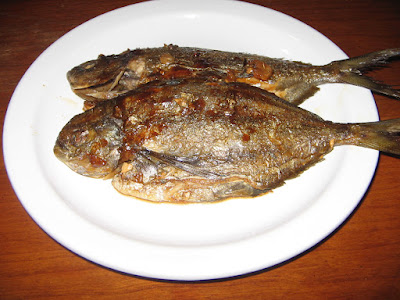
Pan Fried Pompano Fish

I love Asian pan fried fish! I wish I had fish more often, but it's so hard when there is not Asian super maket nearby.

I luckily was able to buy some pompano fish recently, so I was quite happy. They taste good and are relatively cheap!

Pan Fried Pompano

Ingredients
- 2 Pompano fishes
- 6 thin slices of Ginger Root
- 1/4 tsp of salt
- 1 - 1.5 tbsp soy sauce
- 1/4 cup water
- 2 tsp oil

Preparation:
1. If the fish is not already gutted, gut the fish.
2. You gut fish by first cutting right under the fish's head. Then make an incision from underneath the head, down to the fish's belly. Yank out the innards and guts, and wash clean.
3. When fish is cleaned, rub salt all over the outside and inside of the fish.
4. Lay sliced ginger both outside and inside the fish.

Here is my prepared fish (still raw):


Cooking Instructions:
5. Place oil in skillet. When oil is hot, lay the fish into the skillet and cover.
6. When the fish is done cooking on one side (about 5 minutes on high heat), turn the fish over, being careful not the tear the thin fish skin. (Add more oil if you're having trouble).
7. Turn the fish over and cook until that side of the fish is cooked (about another 5 minutes or so). Cover or don't cover, your preference.
8. Pour soy sauce into skillet, then pour in water, making this gravy.
9. Turn fish over until both sides of the fish are coated in the gravy.
10. When the gravy thickens, the fish is done!

Here is my finished masterpiece. Mmm.:

Friday, August 24, 2007

Stuffed Baby Eggplants

My sister/roommate Grace surprised me when she came home one day with the cutest, purplest, babiest, eggplants!
They so adorable. (goochie goochie gooo....)

My sister told me to take the baby eggplants and to "work it".
I was not sure how to "work it", but I felt quite nervous, feeling the expectation to make delicious eggplants! oh no!
So I decided to stuff these little babies. And I was quite happy with the result!
(thanks to Jeff for helping me chop the veggies and being my little kitchen helper!)

These Stuffed Baby Eggplants makes wonderful appetizers or party favors!


Stuffed Baby Eggplants

Ingredients
- 8 Baby Eggplants
- 4 tbsp Green Bell Peppers (diced)
- 4 tbsp Onion (diced)
- 2 cloves Garlic (diced)
- 8 tbsp Bread Crumbs
- 2 eggs beaten
- 1/4 tsp salt
- 1/8 tsp dried oregano
- 1/4 tsp dried basil
- 2 tsp olive oil
- 8 oz bag of shredded mozzarella cheese

Instructions:
1. Wash all your vegetables, bowls, utensils, and pots!
2. Remove the stems off the eggplants and cut each eggplant in half lengthwise. Scoop out the pulp using a spoon, leaving 1/4 inch thick shells


3. Chop/dice (your preference) the eggplant pulp/meat and place into a bowl.
4. Add diced bell peppers, diced onion, and diced garlic into the bowl of eggplant pulp.
5. Preheat oven to 350 degrees F
6. Spray non-stick cooking spray, or evenly grease a baking pan. Place shells face up into the baking pan.
7. Place olive oil into a skillet and heat up the oil on the stove, on high.
8. When oil is hot, add the bowl of eggplant-pulp mixture and cook until ingredients are tender.
9. When mixture is done, remove from heat, and stir in 1/4 cup of mozzarella cheese, the eggs, then the bread crumbs, then the herbs and salt.
10. Spoon eggplant-pulp mixture evenly into the eggplant shells.
11. Place eggplant shells into the oven, at 350 degrees, for about 25 minutes, or until the shells are softened.
12. When the stuffed eggplants are ready, sprinkled mozerella cheese over the eggplants, and pop them into the oven for another 3 minutes, or until the cheese is melted.

Here is the finished result!:

Updated French Onion Soup Photo

So my last french onion soup photo came out really bad.
I apologize.
But I took a new photo, and it came out much better, so here it is!

Jen's French Onion Soup (excuse the burnt cheese pieces on the sides of the bowl)

Monday, August 20, 2007

peaches on growth hormones!

When Jeff and I drove up to SF this weekend,
we also stopped by to visit Jeff's Dad and Grandma in Oakland.

During our visit, we were given a big heaping bag of peaches!
And these were the biggest peaches I have ever seen (either that or I have only eaten puny peaches in my lifetime).

Look at them!
I think I smell a fruit/peach salad coming soon!


--------------------
I also purchased a 3-tiered stacked steamer when I was up in Oakland.
So horray! I can steam foods in abundant amounts now!

Thursday, August 16, 2007

Steamed Chicken

Until I have a steamer, I will have to continue cooking with my weird steaming-apparatus.. =/

Oh well. I like steaming my food now! Because it's so much healthier than cooking things in a pan with oil, and it retains more flavor than boiling (and boiling causes meat to dry out too!)

So yay for steaming!
If anyone feeling generous, feel free to buy me a food steamer.... =D!
You can purchase my ideal food steamer here!:
http://importfood.com/stacked_steamer.html

So anyways, because I used a make-shift steamer, I was only able to steam about a pound of chicken.
However, I recommend that this dish be made in larger amounts, so I will be writing the recipe in terms of 3 pounds of chicken.

Salty Steamed Chicken

Ingredients:
- 1 Whole Chicken (or about 3 pounds of chicken pieces)
- 1- 1.5 tbsp Salt (try this. if you prefer a more salty flavor, up the salt to 2 tbsp)
- 2 tsp Sugar
- 1 tbsp Fresh Ginger (sliced)
- 2 stalks of Green Onions (sliced)

For Dipping Sauce
- 2 cloves Garlic (chopped)
- 1 tsp Fresh Ginger (sliced)
- 3 tbsp soy sauce
- pinch of sugar

*note*
I personally was not too fond of the dipping sauce, even though the other dip-user liked it.
Perhaps the next time I make steamed chicken, I will make a fish-sauce based dipping sauce in addition to this dipping sauce, so everyone can be happy!


Instructions:
1. Wash chicken and cut off any excess fat (eww... fat ::shudder::)
2. Rub salt, sugar, green onion, and ginger all over chicken and under the skin.
3. Set chicken in the steamer, and let steam for about 1 hour.
4. The chicken should be done when it's no long pink near the bone, and does not bleed.
5. When chicken is fully cooked, remove the chicken from the fatty water it's sitting in.
6. For the dipping sauce, mix all the ingredients together.
7. Slice chicken and serve with the dipping sauce in a separate bowl.

how simple.
...
so simple, you (yes YOU) should make me some steamed chicken, while I go take a nap. =)

Sunday, August 12, 2007

FRIED RICE. so typical

FRIED RICE. so typical,
it should not even be blogged about on here!
I wanted to keep my blog with recipes of meals that are more rare, more special.

However, the fried rice I made last night came out so pretty, and so good, that I couldn't resist blogging.

I mean.... how can you say 'no' to my bucket-full of fried rice?


Half-full bucket!


Zooooomed-in bucket!


Asian Chicken Fried Rice


Ingredients:
- 2 cups rice (uncooked). Cook rice beforehand, let it cool.
- 1 pound chicken breasts, cut into small cubes
- 3 sweet chinese sausages, cooked and cut into small cubes
- 1/2 cup of frozen mixed vegetables
- 4 eggs, beaten
- 1/4 tsp salt
- 1/4 tsp Lawry's Seasoned Salt
- 1/4 tsp black pepper (more or less depending on how much you like black pepper. or none at all!)
- 2-3 tbsp soy sauce (more or less, depending on how salty you want it).
- half small yellow onion, diced.
- seasame oil

Instructions:

1. Add sesame oil to skillet, and pour in eggs when the oil is hot.
2. Scramble the eggs and add in the salt.
3. When the eggs are scrambled, scoop them out of the skillet and set aside.
4. Add sesame oil to the skillet once again, and pour in onions when the oil is hot.
5. Saute onions until golden, then add in cubed chicken breast.
6. Saute and turn the chicken+onions until the chicken is no longer pink. Add in seasoned salt and turn some more.
7. Scoop out chicken+onions and set aside.
8. Pour cold rice into the skillet. Constantly turn the rice until the rice is thoroughly heated.
9. Add the scrambled eggs, chicken+onions, chinese sausages, and frozen vegetables into the rice.
10. Turn the rice until all the ingredients are thoroughly heated/cooked. Then add in the soy sauce.
11. Turn the rice mixture until the soy sauce is distributed evently. The rice should be a uniform light brown color (refer to my fried rice images above).
12. Taste test the fried rice. If it is the way you like it, then it's done!


*note* I did not do it for my dish, because I did not have any, but adding chopped green onions into the rice adds more flavor and fragrance into your fried rice.

Friday, August 10, 2007

French Onion Soup! my most sophisticated concoction yet!

A couple weeks ago, Jeff and I went driving around all over Santa Monica and Westwood in search of French Onion Soup!
Our search was fruitless.... or shall I say 'onion'less...

Anywho. So why waste time driving around searching for overpriced French Onion Soup anyways? Make it at home!

I had no idea how to make french onion soup,
so I went around feeding a bunch of different French Onion Soup recipes,
then I made my own soup!

Rich & Soothing French Onion Soup


Ingredients:

- 4 medium or 3.5 large yellow onions
- 3 cans of low sodium, low fat chicken broth (if you want to make your own broth, it's 5 1/4 cups)
- 1/4 tsp salt
- 1/8 - 1/4 tsp black pepper (amount depends on your preference)
- 3/4 cup dry white wine ( I used 2 buck chuck wine and it was really good!)
- 1-3/4 tsp all-purpose flour
- 3 tbs butter
- 1/8 tsp dried parsley
- 1/8 tsp dried thyme
- 3/8 inch Baguette slices (or bread of your choice. I used whole wheat bread)
- 1-1/2 cups of grated Gruyere cheese

The great thing about this soup, is that it's not very expensive to make (the only expensive ingredient is the cheese), and it's quite filling!

Instructions:
1. Slice onions very thinly. About 1/8 inch thick. The thicker you slice the onion, the more noticeable and more chewing you will have to do, when you are drinking your soup! So you can't be lazy with this job!
2. In a large soup pot, melt the butter over medium heat.
3. When butter is completly melted, add all the onions, salt and pepper. The onions maybe seem overflowing at first. But they will quickly cook down.
4. Caramelize the onions!
5. How do you caramelize onions? Turn the heat on medium. When you stir the onions, make sure they are all evenly coated with the butter.
6. Turn the onions with your spatula every few minutes or so. This is to prevent the onions from burning.
7. Continue to toss and turn the onions for about 35 minutes, until they turn into a dark rich golden color. This is the sugar in the onion caramelizing.
8. When you are done with the 35 minutes of onion turning, then congratulations! You have finished the most annoying part of the recipe!
9. When your onions are all caramelized, and golden (a dark straw color), stir in the flour and cook for another 3 minutes, stirring frequently to prevent sticking.
10. Add the white wine, and stir and scrape for 5 minutes, to loosen any caramelized juices.
11. When ready, add all the chicken broth and the herbs (parsley and thyme).
12. Stir and soup and bring to a simmer.
13. Taste your soup. If it is not salty enough, then add more salt. And add more pepper if you desire too. If it's too salty, either add more broth, or a few drops of water.
14. Cover the pot, and let the soup simmer on medium-low heat for 25 minutes. Stir every 10 minutes or so.
15. Toast your sliced bread in the oven at 350 degrees, until golden.
16. Turn off the flame of your soup, at the end of the 25 minute mark.
17. Increase oven temperature to 450 degrees.
18. Pour hot soup into oven-safe serving bowls.
19. Top the surface of your soup with the bread slices.
20. Top the soup and bread with the shredded gruyere cheese. Be generous, and don't leave any gaps! The cheese is the good part!
21. Place the bowls in the oven, for about 10-15 minutes, or until the gruyere cheese is bubbling, melting, and turning golden.
22. Be careful when taking the bowls out! Very hot!
23. Enjoy! mmm.
24. I surprised myself when I tasted my soup. Tastes just like the way it does at pricey restaurants!

PHEW! That was a lot of steps!

A photo of my French Onion Soup!
(I didn't fill my bowl to the top because I wasn't very hungry! but it was still delicious nonetheless)


Thursday, August 9, 2007

Fruit Fly Soup!


Sorry for the lack of posts this past week!
My apartment became infested with fruit flies (it was terrible...)
So even though fruit flies do not carry any diseases, I still felt too disgusted to cook.

To take care of the fruit fly invasion, I concocted a fruit fly soup trap to rid the kitchen of the fruit flies!
and mwhwhha. it worked!


Fruit Fly Soup Trap Recipe

Ingredients:
- disposable bowl (i used a styrofoam bowl)
- 1/4 cup sugary drink (fruit juice, sodas, etc)
- 1 tsp sugar
- 1 tsp cooking oil
- 3 drops of dish-washing liquid
- saran wrap + tape

Instructions:
1. Pour all the ingredients into the bowl and mix
2. The sugary ingredients is to lure the flies to your trap.
3. The cooking oil and dish-washing liquid is to make the water surface stickier, so the flies will not be able to fly away once they land
4. Wrap the bowl in saran wrap, and tape up the bottom, so the saran wrap does not fly away
5. Create a 1 inch hole in the center of saran wrapped bowl, and cut slits around the other areas of the saran wrap.
6. The holes are there for the flies to enter, but the saran wrap is to prevent them from crawling out. They usually die before successfully crawling all the way out of the bowl and saran wrap. (remember, they can't fly out, since they get all sticky from the concoction!)
7. Place bowl in a very popular fruit fly area and watch them commit suicide.

hungry anyone? there's soup, with lots of protein!


I was planning on posting up a picture of the aftermath.... but my sister advised me not to.
( booo!!! >=O )
So if anyone is interested in seeing it, leave me a comment and I shall put it up =P

Wednesday, August 1, 2007

stir fried nian gao

a close up pic of the dish I made! soo good..


The last time I was in Chinatown, to buy more baby turtles (not for turtle soup!), Jeff and I stopped by a chinese store, to peruse their chinese-snack selection.

During our perusing, I picked up a bag of dried nian-gao (asian rice cakes), and was like "whoa! these are good!"

Jeff has mentioned in the past that he also really likes this stuff, and it was only 59 cents, so we grabbed a bag.

Now I regret not buying 2 or 3 bags.

It's so delicious!

So those who don't know, "nian2 - gao1" is this white.. sticky... rice thing. (english name is just "sticky rice cake". It is defined as both "sticky cake" and "year cake"; a play on words, since the pronunciation of "nian2" means both 'sticky' and 'year' in Chinese, and the Chinese typically eats this stuff during New Years.

Anyways. On with the delicious recipe!

Stir Fried Nian Gao:

Ingredients:
- 1 pound of sliced chicken meat (or pork)
- 1 bag of dried nian gao (14 oz)
- 2 stalks of green onion (chopped)
- small handful of chinese broccoli (chopped)
- 3 tbsp oyster sauce
- 2 tbsp soy sauce
- 2 cloves of chopped garlic
- water
- 2 tsp sugar
- feel free to add any other vegetable of your choice (ie: carrots, bok choy, etc)... My dish would have included more vegetables, if I actually had a car to go grocery shopping.....

Preparation:

1. This type of nian gao cannot be cooked straight out of the bag. There are the frozen kind and fresh kind, that can be. But I didnt buy that kind. So there.
2. Soak nian gao in water overnight. You could soak for more than 1 night. And if you do (i did), then change the water after each night

Cooking Instructions:
1. When nian gao is done soaking, heat up a pot of water to boiling and dump in nian gao.
2. Add a few drops of veggie oil into the pot and stir, to prevent the nian gao from sticking to each other.
3. When nian gao is at this desired tenderness (al dente!), drain.
4. In a skillet, add some vegetable oil. When oil is hot, add chicken. Throw in garlic
5. Cook chicken and garlic on high, until chicken is almost cooked thoroughly.
6. Add oyster sauce, soy sauce, and some water.
7. Add the nian gao into the skillet mixture.
8. Make sure there is enough water to cover the nian gao. If not, then add more water. duh!
9. Add sugar into mixture, and stir
10. Stir mixture occassionally, ensuring that the sauces gets mixed evenly, and the nian gao doesn't stick. But don't stir too vigorously either. The nian gao could break.
11. If the mixture isn't salty enough, add more oyster sauce.
12. Throw in vegetables.
13. Let mixture cook on medium-high heat, still stirring occasionally, until the veggies are cooked, the gravy dries up a bit (it should not look like a soup), and the gravy is a consistency that you desire.
14. If you don't know if your dish is done, or if you did it right. just compare it to the pictures of my dish! (refer to above and below). If it looks like mine, then you did it right =)


Here is my finished masterpiece:


please excuse my cheesey colorful plates