I have potatoes sitting in the kitchen, that I should quickly consume before they start to sprout.
I know, I know.....
Potatoes are still good when they sprout. But I personally don't like how they look once they start sprouting, so I never feel inclined to consume them.
However, there is only one mouth to feed in the house now (mine). Oh sadness...
It sure is depressing to cook by myself, for myself.
Ho hum. But life goes on I guess.
Here is a recipe I made, fit to feed 1 person.
Feel free to double or triple the recipe if you actually have other mouths to feed.. unlike myself.
Lucky you.
Seasoned, Roasted, Potatoes- for 1.
(this is a very very simple recipe. You can easily throw this together with any spice, herb, or seasoning of your choice. the following are just my preferences)
Ingredients:
- 1 large potato
- 1/8 tsp salt
- 1/8 tsp black pepper
- 1 pinch of garlic salt
- 1 pinch seasoning salt
- 1 pinch paprika
- 1 tsp olive oil
Instructions:
1) Cut potatoes into cubes
2) Mix the remaining ingredients.
3) Coat the potatoes evenly with the oil & seasoning mixture.
4) Heat oven to 325F degrees.
5) Lay potatoes on a baking sheet (1 layer)
6) Bake for 25 minutes until golden and crunchy, turning mid-way.
7) Enjoy with your meal. I enjoyed mine with little cheeseburgers I made on the George Foreman.
▼
Tuesday, October 23, 2007
Sunday, October 21, 2007
Pork Sirloin Roast
I spent 3 hours in the kitchen making this delicious Pork Sirloin Roast.
Where is this "sirloin" cut in the pig, you ask?
The sirloin comes from the "loin" area of the pig.
The loin can also be divided up into roasts (blade loin roasts, center loin roasts, and sirloin roasts come from the front, center, or rear of the loin), back ribs, pork cutlets, and pork chops.
(refer to the yellow area in the photo)
This recipe is a full meal in itself, since it is also roasted with vegetables in potatoes.
However, I found out the hard way, that I cannot eat abundant amounts of pork, nor eat pork in 2 consecutive meals.
But don't get me wrong. This is a very delicious, juicy, and tasty recipe.
This recipe is ideal for a romantic dinner occasion (I.e: Valentines, Anniversary, Birthday, etc)
Pork Sirloin Roast
Ingredients:
- 1 pork sirloin (about 3-4 pounds. Mine also had bone-in. Try to find boneless if you can)
- 1.5 small onions, chopped.
- 1 apple (I used gala).
- 1 cup of celery, chopped.
- 2 large potatoes, chopped (I used russet. However, red potatoes are more ideal).
- 2 medium tomatoes, chopped.
- 7 oz white wine
- 3 oz water
- 2 tbsp butter
- 2 tbsp soy sauce
- 1 tbsp Worcestershire sauce
Instructions:
1) Cross hatch the skin and fat on your pork sirloin.
2) Melt butter in a large skillet and fry all sides of your pork on high heat. Caramelize the meat until the skin is crispy and puffy. Carmelizing your meat will give it a more meaty flavor.
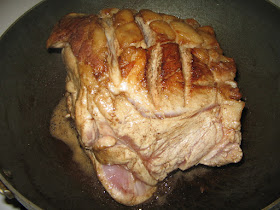
Look at crispy-puffy goodness.
3) Heat your oven to 325F degrees.
4) Place your hunk of meat in a large baking dish. Set aside.
5) Pour off all the excess fat and butter our of your skillet, then add the onions into your skillet.
6) Saute until onions are clear. Then add in celery, apples, and tomatoes.
7) Saute some more, then add the white wine, soy sauce, Worcestershire sauce, and water.
8) Bring mixture to a boil, then pour the mixture over your pork sirloin in the large baking dish.
Ready to go into the oven!!
9) Place your baking dish into the oven, and roast for 1.5 hours. Turn your meat every 30 minutes.
10) In the mean time, boil your potatoes in water for about 20 minutes, or until almost fully cooked. (You could just place the raw potatoes straight into the oven, but boiling the potatoes first saves SO much time)
11) After the 1.5 hours, submerge the potatoes into the saucy vegetables in the baking pan, and bake for an additional 30 minutes.
12) Check your pork sirloin, if the center is not pink, nor bleeding, then your pork roast is finished!
2 hours later..
All done roasting!
13) Thinly slice the pork, and serve with the vegetables and potatoes.
Saturday, October 13, 2007
Appetizer: Baked Zucchini Sticks (not fried!)
I love fried zucchini sticks, when ordering the appetizer sampler plate at restaurants.
Mmmm oh-so-good but oh-so-bad for you. =(
Luckily, however, when you bake oven sticks in the oven, it tastes just as good, and so much healthier than their deep fried counterpart!
With my recipe below, the zuchini sticks came out cripsy on the outside, and soft in the middle. My boyfriend chowed down the whole plate in one sitting! I take it that he liked it =).
Serve these finger foods as appetizers. Great when hosting a party!
Baked Zucchini Sticks
Ingredients:
- 3 zucchinis (medium sized)
- 1/2 cup of bread crumbs
- 2 tsp freshly grated parmesan cheese (I didn't have any fresh cheese, so I used the canned kind... it still came out good!)
- 1/2 tsp dried oregano
- 1/2 tsp garlic powder
- 1/2 tsp black pepper
- 1/4 tsp salt
- 1 tsp olive oil
Instructions:
1. Wash and peel your zucchini (i only peel off half of the skin)
2. Cut your zuccini into 2 inch sticks
3. In a bowl, mix together the bread crumbs, the cheese, the oregano, the garlic powder, the pepper, and the salt.
4. In large bowl, evenly mix the zucchini with the olive oil.
5. Toss the dry bread crumb mixture into the bowl of zucchini, and evenly mix.
6. Heat oven to 450F degrees.
7. Line a large baking sheet with aluminum foil, and place zucchinis on baking sheet.
8. Bake for 15 minutes. Turn, then bake for another 10 minutes
9. So pretty!
Dessert- fried plantains
Plantains are so delicious, and make a very delicious dessert. I like to eat these after a meal since they are very very sweet!
For those who do not know, a plantain is a starchy banana-like fruit, eaten (always cooked) as a staple vegetable throughout the tropic regions around the world.
Plantain Guide (stolen from the sticker on the plantain):
Green - Use like a potato! Perfect as a side dish, in soups, and stews or deep fried.
Yellow with Brown Spots - Great fried and mashed.
Black: Sweet and mainly used as a dessert.
For me, I like slicing my bananas and frying them in a little bit of oil.
Fried Plantains
Ingredients:
- 1 plantain
- 2 tbp cooking oil
- paper towels to blot the oil, when done frying.
Instructions:
1) Get your plantain! Mine is yellowy-brown!
2) Slice plantains into coins
3) Heat up oil. Then fry the bananas.
4) Turn bananas over when it turns golden.
5) Yummy and Easy peasy!!
Saturday, October 6, 2007
2x Mushrooms & Tofu
I have been sick with a cold this week,
so I have not been craving to eat any type of heavy or greasy meat dishes.
I had two types of mushrooms in my fridge (Enoki mushrooms, and this giant mushroom.. i have no idea what breed of mushroom it is... All i know is that I got it from my mom),
and I also had a box of tofu lying around the fridge for quite some time.
What are Enoki mushrooms?
They are a native Asian mushroom commonly found growing on tree trunks or tree roots. Enoki come in clusters of long stems topped with tiny white caps. Enoki are rich in vitamins B1 and B2, and also contain enzymes that are converted into vitamin D in the body. Avoid overcooking to preserve their unique, crunchy, texture.
What is tofu? I should hope you already know this, but just to be safe...
Tofu is a soft food product prepared by treating soybean milk with coagulants (as magnesium chloride or diluted acids) that is rich in protein, and popular in many Asian dishes.
I decided that a light, unfatty, dish is exactly what I am looking for.
I was unsure how to make a dish using tofu and mushrooms, so i just threw them together.
I was quite surprised with the results! It was so delicious!
Try it for yourself! Especially on a sick day.
2 x Mushrooms & Tofu
Ingredients:
- 1 box of tofu (firm)
- 1 giant mushroom
(refer to the middle ingredient in the photo -->)
- 1 bag of Enoki mushrooms
- cooking oil
- 1 tsp tapioca starch
- 1/4 cup water
- 2 tsp oyster sauce
- 1 tsp salt
Instructions:
1) Cup up tofu into little squares.
2) Slice giant mushroom.
3) Separate Enoki mushrooms (they grow in clusters, so they require separating, with their roots cut off)
4) Heat up cooking oil in pan, then throw in tofu.
5) When tofu is hot, toss in both types of mushrooms.
6) Stir for about 3 minutes. Mix in oyster sauce and salt.
7) Stir until seasoning is evenly distributed.
8) In a seperate bowl, dissolve tapioca starch in the water, then dump the mixture into your pan.
9. Let cook for about 5 minutes, stirring occasionally.
Finished!
The dish is slippery, and gooey.
Goes down a sore-throat very easily.
Enjoy with rice porridge or regular steamed rice.
Thursday, October 4, 2007
Salty Tips! Salty Secrets!
Allow me to share some salt tips to my fellow readers:
Oh the wonders that salt can provide....
Salty Tips! Salty Secrets!
- Using a dash of salt in your cooking can enhance the flavors of your food, even if it seems counter-intuitive! I am not sure why this is... I'm no science major, but the salt just seems to distract the tongue from certain flavors and enhancing others??? =/
- When you saute garlic in your cooking oil, right before cooking your dish, it is helpful to add a little salt! This seems to diffuse the flavor evenly throughout your dish, making your dish very tasty (and not too salty!)
- I used to work for a catering company when I was in college (oh the days of scraping in those minimum wage paychecks...). When my bosses were not looking, I always sprinkled a dash of salt into the coffee grinds right before I put it in to brew. Don't worry! The coffee does not come out salty.
Once again, I am not a science major, but I think the salt distracts the tongue from the perception of bitterness, so your cup of coffee appears less bitter. When people add tons of sugar into their coffee, the sugar only attempts to mask the bitterness. But the salt actually fools and distracts your tongue from the bitterness.
- If you have sliced apples that you want to prevent the oxidation process (the browning of sliced apples), soak your sliced apples in a bucket of lighty salted water for a couple of minutes. Rinse before eating.
- When beating eggs or cream, add a pinch of salt before beating. This will whip up your eggs or cream faster
- When I roast chicken, I always rub the inside cavity of the chicken (or foul of your choice) with salt. This makes the chicken tasty from the inside-out, and MOIST!
- It's so hard to wash all that darn dirty our of leafy or tight-knit fruits and vegetables!! (Think spinach, or grapes). Wash your veggie or fruit in a bucket of salted water. This will help cleanse the fruit,, and removes the dirt from the crevices.
Beware! Use salt in moderation!
Of course, please do not consume too much salt.
Eating too much salt is one factor in high blood pressure. And everyone should know that high blood pressure can cause heart disease, diabetes, and other health problems.
How is salt related to high blood pressure?
Sodium is the part of salt that increases blood pressure.
The body needs sodium to hold water in the blood vessels and to regular the water balance within cells. If too much water is held in the body, the amount of blood increases, and that increase in blood will make the heart work much harder, resulting in HIGH BLOOD PRESSURE!
The take home message is:
Salt is very beneficial in the kitchen, but do not overdo it.
Your food won't taste good, and your heart will thank you.
-----------------
Look!
A freight-boat full of salt!
That's a lot of salt! =P
Healthy Dessert - Applesauce!
Apples and Applesauce!
I am cheating a bit, because I have not yet made applesauce yet .
(I've been so busy and tired lately! Forgive me!),
but I decided to put up an applesauce recipe on my blog, for several reasons:
1. I blog too much about food. How about a dessert idea for a change?
2. It's apple season! Even though apples grow year round, their peak season is September to November. And YAY. It's October right now, right in the middle!
3. An apple a day keeps the doctor away. And eating applesauce helps you eat more apples!
4. Applesauce is so easy, you can't go wrong. I should not even be writing a recipe about it!
The best apples to use for applesauce making, or canning/storing are:
Golden Delicious, Paula Red, Rhode Island Greening and Spartan.
This is common sense, but when shopping for apples, select firm, shiny apples, and avoid bruised, dented, shriveled apples.
Homemade Applesauce
Ingredients:
- 4 apples of your choice
- 1 cup water
- 1/2 cup brown sugar, packed
- 1/4 tsp. cinnamon
- 1/8 tsp. nutmeg
- 2 tsp. lemon juice
Instructions:
1. Peel and core apples. Cut into chunks.
2. Heat apples and water to a boil.
3. Turn down the heat to a slow simmer, for about 10 minutes.
4. Stir in brown sugar, cinnamon, nutmeg, and lemon juice. Add more sugar if it's not sweet enough.
5. Continue to cook on low heat, simmer, for another 10 minutes or until apples are soft enough to mash easily.
6. Remove from heat, and smash smash smash!
This make a fun activity when you're bored....
Well, I guess that means I will be making a lot of applesauce this October then! ho hum....