Saturday, July 12, 2008

Pan Seared Tofu with Scallions

I found another set of pictures buried in my camera!
This time it's a tofu dish!
Yum, I love tofu. I should have tofu more often! It's healthy and also filling!

Pan Seared Tofu with Scallions

Ingredients:
- 1 box of 'firm' tofu
- 1 tbsp of oyster sauce
- 3 stalks of green onions/scallions. Use both the white and the green parts.
- 2 tsp of soy sauce

Instructions:
1. Cut tofu up into cubes and slice the green onions.


2. Generously oil the skillet, add the green onions, and and tofu.


3. Cook each side of the tofu until golden.


4. Add the sauce and mix evenly.


5. Enjoy with rice!


Such a simple recipe! It's only somewhat time consuming, to wait for the tofu to fry golden. But difficulty-wise, it's so easy!

Tuesday, July 8, 2008

Garlic & Herb Roasted Chicken

Today, I had dinner at my ex-boss' house. It was a pot-luck themed dinner (where I brought in some dishes I made at home) even though it was just Lake (my ex-boss), Jeff (my boyfriend), and me eating. A really small get-together with a lot of food..... works for me! :)

The items I brought was: whole roasted chicken and scallion pancakes (recipe previously blogged here: http://jensconcoctions.blogspot.com/2008/06/scallion-pancakesgreen-onion-pancake.html).

Everyone loved the chicken, and Lake made sure she kept some of the chicken for lunch tomorrow!

I loved Lake's russian dish of tomato beef. I shall try out her recipe soon, and blog about afterward. So check back soon, for that recipe!


NOTE: this dish is a 2-day dish, so don't intend on making this on a work night! Save it for a weekend activity or romantic date night.


Garlic & Herb Roasted Chicken

Ingredients:
- 1 whole chicken (about 3-4 pounds)
- 1 tbsp salt
- 1 tsp of any of your favorite dried herbs. I used basil.
- 1 tbsp of any of your favorite fresh herbs. I used finely minced parsely!
- 1.5 tbsp of salt-free garlic & herb powder
- 2 tbsp of olive oil
- 3 cloves of whole garlic, punctured.

Instructions:

DAY ONE:
1. Wash your chicken and remove the giblets. Pat dry your chicken with a paper towel. Dry the inside cavity of your chicken by stuffing a paper towel inside.

2. Using your fingers and a knife, carefully seperate the skin from the chicken, starting for the breast meat down to the legs. Make sure you do not puncture any holes through the skin. Use the knife to cut away the connective membrane.

3. In a bowl, mix together the salt, herbs, and garlic powder. Reserve 1/5 of the mixture aside.

4. Using your hands, evenly spread the herb mixture underneath the skin across the whole chicken, massaging the herbs into the meat.

5. Using the reserved mixture, dump the herb mixture into the cavity of the chicken and rub the herbs into the inside of the chicken. Drop the garlic cloves into the cavity.

6. Your hands should have excess herbs and salt stuck on it. Use it to wipe the excess herbs onto the outer skin of the chicken.
=) nothing goes to waste when I'm cooking!


7. Set your chicken into the fridge, and let it marinate overnight or for at least 6 hours. The salt also helps soften the chicken meat.


DAY TWO:
1. Preheat oven to 450 degrees F. Drizzle and rub the olive oil onto both sides of your chicken.

2. Place your chicken, breast side down, on a roasting rack, with a roasting pan underneath to catch all the juices. The chicken is breast side down, so as the chicken roasts, all the juices will drip down into the breast, softening the breast meat.


3. Place your chicken into the often, for 20 minutes.

4. At the 20 minute mark, turn the oven down to 335 degrees F and roast for 40 minutes (you can use either 325 or 350 degrees, if your chicken is smaller or larger than mine).

5. At the 1 hour mark, turn the chicken over to brown the breast meat.

6. Roast for an additional 30-35 minutes. Puncture the thickest part of the meat (I check the thigh meat), to make sure the juices run clear.

7. Let the chicken sit for 10 minutes to allow the juices to redistribute. Isn't that beautiful?


Size of Jeff's head!


8. Serve the meat, and reserve the bones and carcass to make brothy soup! The bones should already be tasty enough to give the soup a lot of flavor and seasoning.
See. Nothing goes to waste when I'm cooking!

The pot-luck for 3 came out wonderful!
We also enjoyed red wine during our meal, and Cheesecake factory cheesecake for dessert.


Sunday, July 6, 2008

Seafood Baby Bok Choy

I am so behind on recipes!
I did not realize how behind I was until I checked my camera!
This dish is so refreshing and light.

I used fish pollock for the seafood component of this dish, but feel free to substitute using other seafood, such as mussels, scallops, or shrimp.


Seafood Bok Choy

Ingredients:
- 4 bunches of baby bok choy
- 6-8 ounces of sea food. (I used fish and cut it into cubes!)
- pinch of salt
- 2 tbsp of tapioca starch


Instructions:

1. Chop up the baby bok choy

2. Massage the flour into the seafood.

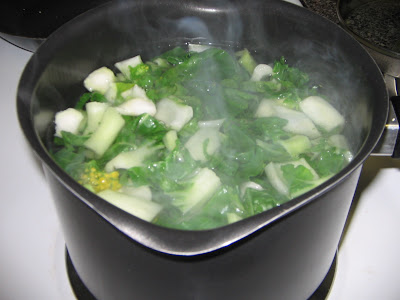
3. Blanch the bok choy in boiling water for 2 minutes and drain.


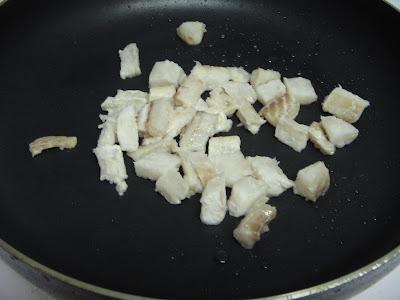
4. Well oil your skilled, and fry up your seafood until almost cooked (about 3 minutes on the skillet)


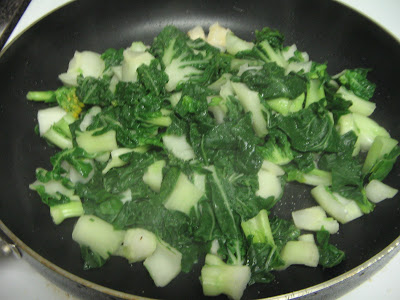
5. Add your bok choy and salt to the seafood and stir.


6. Add a splash of water, so the veggies are moist..


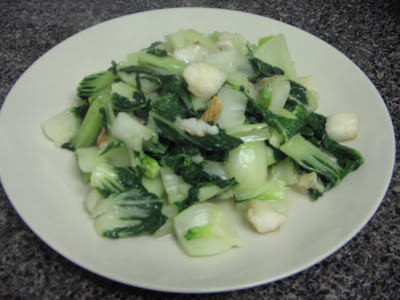
All done! yum!

Thursday, June 19, 2008

Bacon Wrapped Mahi-Mahi

Let me clear this up:

Mahi Mahi, also referred to as "dolphin fish" are NOT dolphins.
Dolphin fish is NOT a dolphin. Dolphins are mammals, and are protected from being fished.
Mahi mahi is a white fish, with a firm texture and mild flavor.

I decided to wrap some Mahi Mahi steaks with bacon, because hey... everything tastes great when wrapped in bacon! Broil for 7-10 minutes on each side, and *voila* tasty fish!.
Mahi-Mahi is great for grilling, and so is this recipe!

Bacon Wrapped Mahi-Mahi

Ingredients:
- 4 Mahi-Mahi steaks, about 5 ounces each, or so.
- some black pepper.
- 8 strips of bacon.

Instructions:
1. Lightly pepper your fish steaks. No salt is necessary in this recipe because bacon already has enough salt.


2. Wrap your fish with bacon, and place in a baking pan.


3. Set your broiler on high, and broil each side for 7-10 minutes.


this dish is so ideal for those busy evenings.. and very filling too.
oh, look how beautiful that is...

Monday, June 16, 2008

Sweet Mung Bean Soup

I hated mung beans as a kid.
But for some reason, I love them now!

And that just works out perfect, since they are healthy and filling.

I love mung bean soup as a cold sweet dish for dessert. I cannot have it any other way. It's so easy too!

This dish is prefect for summer time. According to the chinese (me!), mung beans has the "cooling" effect. So not only is it good for a hot day, but if your body is full of "heat" or "fire", eating this will be good for you, to combat the flames! hehehe.


Sweet Mung Bean Soup


Ingredients

- 7 ounces of dried mung beans
- 13 cups of water
- 13 tbsp of sugar (more or less depending on your preference).


Instructions

1. Soak the beans in a big bowl overnight, or for at least 5 hours.

2. The next day, rinse the beans and place into a large pot.

3. Add 6 cups of water and bring the beans to a boil.

4. After boiling for about 5 minutes, the water should have a light green hue.

5. Pour this light green water into a large bowl to cool, and dissolve 6 tbsp of sugar.


6. Pour this mung bean water into a juice bottle, and chill until cool. Enjoy this as a drink.

7. In the meantime.. Pour 7 cups of water back into the pot with the mung beans and bring to a boil.

8. Simmer the mung beans for about 1.5 hours, or until the beans split open.


9. When the mung beans split open, dissolve 7 tbsp of suger into the soup, and let the soup chill in the fridge.

10. Enjoy the cold mung bean soup and mung bean drink on a hot day!


Wednesday, June 11, 2008

Brunch Egg Scramble

If you have a lot of ingredients that you want to get rid of, make a scramble!

Brunch Egg Scramble

Ingredients:
- 1 large tomato
- 3 to 4 eggs (depending on size)
- 1/4 cup of milk
- 3 slices of bacon
- 1/4 slice of spam, chopped.
- 1 tsp black pepper
- 1 tsp garlic salt
- 1/2 tsp salt
- 1/2 cup of shredded cheese of your choice
- if you have any other ingredients.. spinach.. mushrooms.. sausages.. add them in!

Instructions:
1. Dice the tomatoes


2. Cook the bacon on the stove, until crunchy. Drain on a towel


3. Dice the spam and bacon. I used old spam that I cooked the other day. You can use uncooked spam.

4. Add the salts, milk, and pepper to the egg, then beat.


5. Add oil to a skillet, fry up the tomatoes and spam. Then add the bacon.


6. Add the eggs into the skillet.


7. Scamble. When fully cooked, top with cheese until melted.


enjoy with toast!

Tuesday, June 10, 2008

Braised Trio –Shitake mushrooms, chicken, and tofu

The soy-sauce braised trio consisting of shitake mushrooms, chicken, and tofu is so warm and delicious when served over a bowl of white rice. This dish is a favorite for my boyfriend and I, because we are both a fan of Asian shitake mushrooms. The dish is definitely not the same without the mushrooms.

Braised Trio –Shitake mushrooms, chicken, and tofu

Ingredients

1 cup of shitake mushrooms, pre-soaked in water, sliced in half.

1.5 pounds of chicken legs

3 cups water

½ cup of soy sauce

1 tbsp sugar

1 chunk of fresh ginger

2 cloves of garlic

1 packaged cube of firm tofu, sliced into cubes.

extra water for boiling the chicken

Instructions:

1. The night before, soak the dried shitake mushrooms in water, so they soften.

2. The day after, drain the mushrooms, slice in half.


3. Boil the chicken legs in water for about 5 minutes, until foam emerges from the chicken.

4. Toss the foamy water and wash the chicken legs under running water.

5. Place chicken in a pot, add the 3 cups of water and ½ cup of soy sauce.


6. Bring the pot to a boil, and then add the sugar, ginger, mushrooms, and garlic.


7. Cut tofu into cubes. You can either add the cubes directly into the stew or fry up the tofu cubes until golden on all sides (yum!) then add into the stew.


8. When boiling, lower the heat to a simmer. Simmer for 25 minutes, turning the occasionally.


9. When finished, the chicken leg tendon should pull away from the joint bone, and meat should fall off the bone.


Serve the chicken, mushroom, and tofu in a bowl of steamed white rice. Ladle some sauce into the rice.


Scallion Pancakes/Green Onion Pancake

Scallion pancakes are a Chinese dish, is a salty non-leavened flatbread folded in oil and green onions. The name in Chinese translates to “Scallion Oil Pancakes”. I always loved these as a kid. Now, I can make them myself, anytime I want! And so can you!
This dish is fairly time consuming, but it makes a great family activity!


Scallion pancakes

Ingredients:
- ¼ cup of vegetable oil
- 1 cup of hot water
- 4 cups of all purpose flour
- 4 stalks of green onions/scallions, diced finely.
- 5 tbsp of salt (or if you are me, make a mixture of 3 tbsp of chicken boullion powder with 2 tbsp of salt).
- Extra flour to flour your hands and large cutting board.

Instructions:
1. In a large mixing bowl, mix the flour and water together. Make sure the dough is not so sticky that dough sticks badly to the mixing bowl. Add more flour or hot water accordingly.


2. When the dough is thoroughly mixed, let the dough sit in the bowl for about 20 minutes.


3. Break the dough into 4 pieces.

4. Roll out 1 piece of dough onto a large cutting board. Flatten the dough into a large round pancake shape, about 1/8” thick.


5. Add a thin layer of vegetable oil to the whole surface of the pancake.


6. Add a thin layer of the salt mixture over the whole surface of the pancake. Lightly rub into the oily pancake surface.


7. Add a thin layer of chopped scallions onto the surface of the pancake.


8. Slice the pancake into 6 (or 7 or 8, depending on size) flower petals with the center of the pancake unsliced.


9. Fold each petal on top of the pancake center, each petal going on top of the previous petal.


10. Your pancake ball will now have 6 layers. Roll the pancake into a ball, then use the rolling pin to flatten the dough into a flat 1/8” thick pancake again, set aside.


11. Repeat steps 4-10 until all the dough is used up.

12. Heat up a well oiled skillet.

13. Place pancake in the skillet. Flip the pancake when golden.


14. Pancakes are done when both sides are golden.


15. Slice pancakes into wedges, and enjoy!