Tuesday, September 25, 2012

Teriyaki chicken - working backwards

A few weeks ago, I picked up a box of frozen teriyaki chicken from Costco.  I normally don't buy frozen meals from the grocery store, but finding time to cook during that time was impossible so it was either buying frozen food, or Mc Donalds!
$10 yielded me 2 pounds of pre-fried, pre-frozen chicken chunks and 2 bags of teriyaki sauce, which you pour over the chicken after you heat up the chicken on the stove top.  Not a very good value if you ask me!

Flash forward to this weekend.  I now have a bit more time to cook during the week so I picked up some fresh boneless, skinless, chicken breasts at the grocery store at $1.99 per pound (what a deal!).  Not knowing what to do with these chicken breasts, I asked some people for suggestions.  I got some suggestions like making fajitas or putting it in a slow cooker with cream of mushroom soup.  Both weren't really what I was feeling.  Maybe it's because I'm not a fan of mexican food and I'm not a fan of cream-of-anything soup.
Then in the shower, I thought of exactly what I wanted to do with the chicken breasts: I'm going to work backwards and replicate that frozen teriyaki chicken meal.

First, I made the teriyaki sauce.
Sweet, thick, garlicky, how can anyone not like teriyaki sauce.
1/4 cup soy sauce
1 cup water
1/2 teaspoon ground ginger
1/4 teaspoon garlic powder
5 tablespoons packed brown sugar
1 -2 tablespoon honey
2 tablespoons cornstarch
1/4 cup cold water
Mix all but cornstarch and 1/4c water in a sauce pan and begin heating. Mix cornstarch and cold water in a cup and dissolve. Add to sauce in pan.  Heat until sauce thickens to desired thickness.
Set the teriyaki sauce aside.

Take the chicken breast and slice them into thin slices.  Heat up olive oil in a large skillet or wok.
Thinly coat each chicken slice in corn starch and place into the oil.  Turn the chicken over when it's golden and crispy on the first side, and cook until the other side is golden and crispy and the meat is cooked thoroughly.  Around 8-10 minutres.
Turn off the heat and drizzle the teriyaki saucw over the chiocken.  Mix well.

And there you go!  A better version of the frozen entree version for a fraction of the price.  It's easy to make too!

Sunday, September 23, 2012

Butternut Squash! It's officially Fall!

Yesterday was the first day of Fall, and what better way to celebrate it than to go to the grocery store and pick up two beautiful butternut squashes.

Normally I would just buy one, which is more than enough for my husband and me, but now that we have a wee little one in the house that recently started eating solids (and butternut squash is a great "first foods" for babies), then two butternut squashes it is!

I simply had my husband slice the necks off each butternut squash, then slice each segment lengthwise, then steamed them for 1.5 hours.
I thought it would take maybe 30-40 minutes to steam, but maybe it's because I tried to steam a lot of butternuts at once that it ended up taking 1.5 hours?
After they were steamed and cooled, I scooped the meat out of the shell, discarded the shells, saved half for my husband and I to enjoy later, and pureed half with a little bit of cooking liquid.  The pureed butternut squash was then placed into an ice cube tray, which makes individual portion sizes for our wee baby.

Today, us 3 all enjoyed some butternut squash!  It was very sweet and was the perfect way to welcome the Fall season.  If the butternut squash is too plain for you, enjoy it with a bit of brown sugar or maple syrup.  Btw, I think butternut squash is my daughter's favorite -- she gobbled it down!

Tuesday, August 14, 2012

Miso glazed salmon

Apologies for not posting for so long! 
I'm still cooking, but with the new baby (and a new baby blog, hehee), I am falling behind on food blogging.
I've also been cooking a lot more simple lately, so most things aren't blog worthy!  (unless you consider steamed vegetables with a dash of salt blog worthy....)

This miso glazed salmon recipe IS blog worthy.  I'm a fan of asian-tasting dishes and I'm a fan of anything with miso in it, so this dish can't go wrong.
It's sweet, it's salty, and it's the only way I'm ever going to make salmon ever again.  =]

What you need:
    1/4 cup packed brown sugar
    2 tablespoons soy sauce
    2 tablespoons hot water
    2 tablespoons miso (I use red miso)
    4 salmon fillets (about 1 inch thick)

Instructions:
Combine the brown sugar, soy sauce, water, and miso in a bowl until evenly mixed.  Lay your salmon on a baking sheet, and brush the sauce over the surface of your salmon fillets. 
Broil the salmon under the broiler (about 4 inches away) on high.
 If you are using salmon fillets, broil for about 10 minutes.  If you are using bone-in salmon steaks, broil for about 14 minutes (for a 1 inch  steak).
Serve with steamed brown rice. yum yum!

(sorry there is no picture! I made this dish a month ago, and I forgot to take a picture. I just dug right in!)

Sunday, March 11, 2012

Cinnamon Sugar Bread Crusts: another use for old bread crusts

Remember all that leftover bread crusts I had from my baby shower? And how I used some of the bread crusts to make bread pudding (which ended up being more bread pudding than I wanted to eat)?

Well, I recently had to create more space in my freezer, to stock up on food and freezer meals since our baby is due to arrive any day now. 
To create more space, I had to get rid of more bread crusts!
This time, I made Cinnamon Sugar Bread Crusts!  Or as I called them, "Cinna Sticks".
They come out so crunchy, sweet, and airy.

Bread crusts, sliced.  I had probably around 5 cups worth of sliced bread crusts.
1/2 c. butter, melted
3/4 c. sugar
1 1/2 T. cinnamon

Place bread crusts in a large bowl.
Pour melted butter on top.
Toss to coat.
Pour in the sugar and cinnamon and toss again
Spread 1 even layer onto a cookie sheet and bake at 325 degrees for 30 minutes, flipping once mid-way through.

By the way... I STILL have not gotten rid of all of my bread crusts yet (I already gave away 1/3 of the crusts to my Mom).
Maybe I will make a meatloaf next. 

Saturday, March 3, 2012

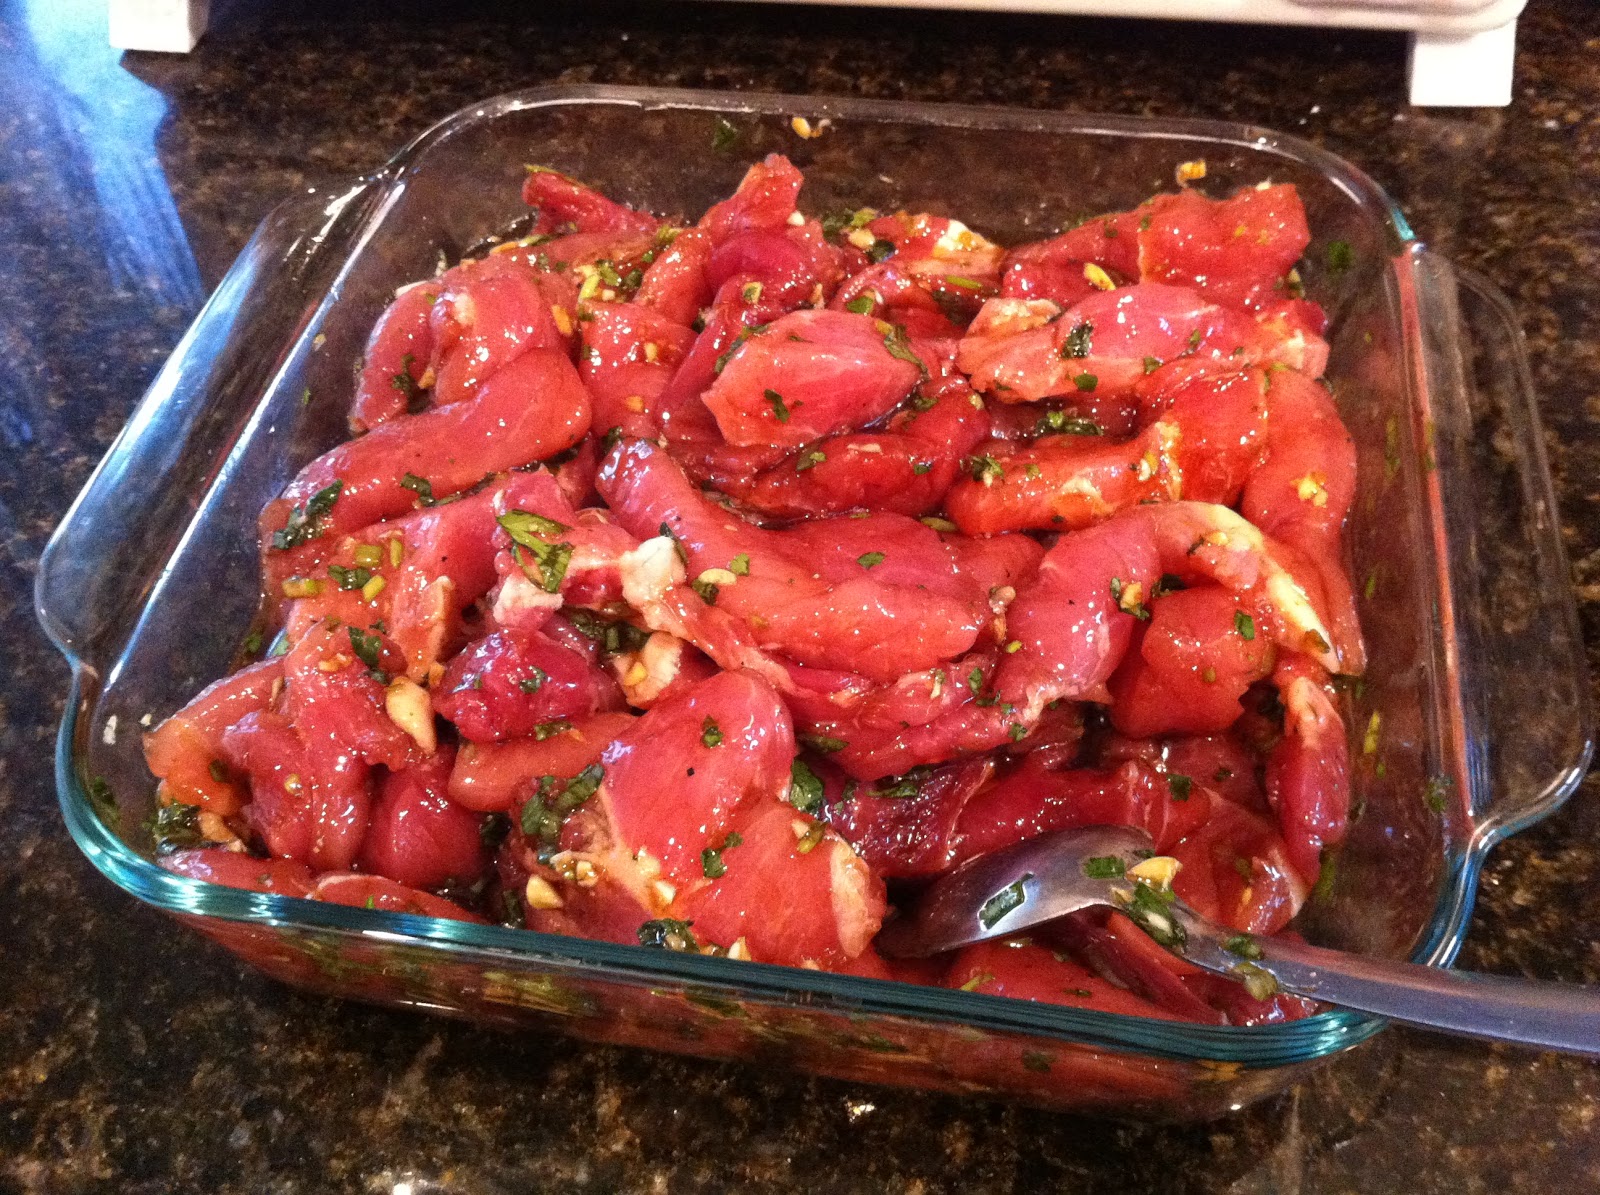
Vietnamese (inspired) grilled pork

The Vietnamese dish, Thịt Nướng, was my inspiration for this dish.  I always love the grilled or charbroiled pork dishes at Vietnamese restaurants but I never order them when I eat out because pho always wins me over in the end.
However, I found boneless, skinless, trimmed pork chops on sale at Sprouts ($1.49 a pound! what a steal!), and I decided to make my own dish at home!

The only differences between my pork dish and thịt nướng is that it is typically consumed with vermicelli noodles, but I had my pork with rice since rice > noodles (that's a fact!).  Also, I did not slice the pork as thinly as thịt nướng typically is and I omitted lemongrass since I don't have any.  But other than that, everything still came out delicious

I know a number of people that refuse to eat pork due to reasons such as "pork is very fatty", or "pork is very unhealthy" ***
However, I think when a lot of people think of "pork" they think of: bacon, sausage, ham, etc... 
And it's true, all these items are really unhealthy.  But what is also true, is that all those items are heavily processed, made of pork fat, and are treated with chemicals.  It is not pork in their true form.
When I say "I eat pork" or "I cook pork", I'm talking about the actual cut of meat and it is typically a pork tenderloin.  Did you know that a 3oz serving of pork tenderloin contains 2.98g of fat and that the same portion of skinless chicken breast contains 3.03g of fat?  Yep, you read that correctly, pork tenderloin is leaner than boneless skinless chicken breast!

That's actually the reason why pork can be very hard to cook: because it is so lean, you can easily dry out the meat.  And similar to chicken, pork does not have a lot of flavor so when cooking pork, you need to add in a ton of your own flavor.  That's why for this dish, I put in so many ingredients into the marinade and marinated the pork overnight.


Ingredients for the marinade:
4 Tablespoons Fresh Garlic, minced
6 Tablespoons Cilantro, finely chopped
2 Tablespoon Brown Sugar
2 Tablespoon Honey
2 Tablespoon Fish Sauce
3 Tablespoons Soy Sauce
2 Teaspoon Fresh Cracked Pepper
2 Pounds lean pork chops, sliced into 2-3 inch strips
 

Mix all the marinade ingredients together with the pork and let it marinate in the fridge overnight.

The next day, remove pork from the refrigerator 5-10 minutes before grilling to take the chill off the meat. Heat your grill pan on medium high heat (you want a good sear, but not burn the meat!  Especially since there is sugar in the marinade) and lightly cover with cooking spray (You can also use your outdoor grill!).

Grill the meat until both sides are browned and cooked thoroughly.  Garnish with chopped green onions.

-------------------------
***
Another reason I've heard from people, for why they don't eat pork, is because it's "gross" and it has "worms" in it.  As far as I know... not all pork has worms in it.  I have also heard that you are more likely to get sick from eating undercooked chicken (salmonella poisoning) than you are from eating undercooked pork.  If that's the case, isn't chicken more "gross" than pork?

Saturday, February 25, 2012

Garlic Sauteed Snow Pea Leaves

Let me first begin by telling you how important it is to cook your vegetables rather than eating them raw, if you want to up your veggie intake.
Of course, don't overcook your veggies to the point when all the nutrients are gone, but cook them down, that way, it's easier for you to consume more vegetables per meal.  Also, if you consume more veggies per meal, then that means you will eat less of other stuff, like meats and starches.

I have heard the following quotes numerous times from different people:  "I love eating vegetables, I eat so much!" or "You really should eat your vegetables, just like me.  They are so healthy for you". 
Yet, these folks only graze on a few sprigs of salad during their meal.
Seriously?
If I took the amount of salad that they gnawed on and steamed it, it will be a small coin sized dollop.  (And of course, these folks eats their salad with some dressing, which is a no-no as well, but I won't get into that).
Graze all you want.. 30 minutes.. 1 hour...
No matter how much salad you masticate, it won't be anywhere near the amount of veggies I eat per meal because I simply cook it down, which makes ingesting large amounts of vegetables WAY easier. 

Now with that said, I have a lovely sauteed vegetable dish to share: Garlic Sauteed Snow Pea Leaves.

This is a very little known dish that I have only seen on Chinese restaurant menus, and I have never seen this dish cooked in anyone's home.  Maybe it's because snow pea leaves aren't very affordable... or maybe it's because restaurants do a hell of a better job with this dish since they have their fancy giant woks and high heat.
Eating sauteed snow pea leaves is like eating a tougher version of sauteed spinach, but with a hint snow pea flavor.
I really suggest picking up a bag of snow pea leaves if you ever see them at the grocery store (I've only seen them at Asian grocery stores).  I also suggest ordering this dish off the menu next time you are at a Chinese restaurant!

I picked up a large bag of snow pea leaves from Ranch99.  When I got home, I pruned the leaves by discarding the coils, since these are a bit tough, and rinsed the leaves thoroughly. 
Notice how much snow pea leaves I have in the photo on the right?  That is how the veggies looked raw.  Imagine someone trying to eat that amount of veggies in a salad?  They won't make a dent.

Now, time for the sauteing!
Heat up some olive oil in the largest wok/deep pan that you have. 
Add minced garlic to the olive oil  (I love garlic, so I used about 5 cloves of garlic). 
When the garlic looks golden, add the snow pea leaves into the pan. 
Turn the leaves until it is evenly coated with the garlic and olive oil, then add a sprinkle of salt.
Cover the pan with a lid for about 3-4 minutes, then stir the veggies.  The veggies should be done, but if they are still a bit tough for you, cook for an additional 1-2 minutes.

Now look at the photo of the cooked snow pea leaves.
That giant bowl of raw snow pea leaves cooked down into a small lump that fits in our cereal bowl.  Just eating a few bites of this dish would be the equivalent of a week's worth of veggie-intake of a salad eater!

Cat Fish Tacos!

This meal is actually from a few weeks back, but I've been so busy posting about Valentines and my baby shower, my poor fish tacos got put on the back burner!

So a few weeks ago, I had 2 avocados going terribly ripe in my fruit bowl.
I was thinking "what can I make that utilizes avocados?"
It just so happened that I also had some leftover corn tortillas in my freezer, leftover from the last time I made chicken enchiladas.

Avocados?  Tortillas?  Sounds like it's time to make some fish tacos!

I am always lamenting that there is no good place near me to buy fresh fish at a great price (I know, I live biking distance to the ocean, yet, I am as screwed when it comes to buying seafood as a Mid-Westerner).

Poor little me, I reluctantly dragged my feet to the local Ralphs and bought the cheapest fish I saw: "catfish nuggets".  I bought 2 pounds.
The catfish nuggets looked as appetizing as the name: random chunks of wet, slimy, catfish meat.

I checked out the tomato and onion prices at Ralphs, thinking I could make some pico de gallo, but after seeing their prices, it looks like my fish tacos will simply consist of fish, avocados and tortillas.

To make the fish tacos, I started by coating the catfish nuggets in some corn starch, salt, and pepper.  Then in my cast iron skillet, I poured a thin layer of canola oil and cooked each side of the catfish nuggets until golden and crispy.  I have to say,  the cat fish actually tasted a lot better than I expected.  It was actually pretty good!
I steamed the tortillas in the microwave and sliced up the avocados.

We assembled the fish tacos at the dinner table ourselves. 
Extra fish and avocados for me please!
Perhaps some people would prefer a little more flavor in their tacos, like some salsa, but we were quite happy with simply the fish and avocados.

By the way, if you know of any good fishmongers on the Westside, please tell me!!

Sunday, February 19, 2012

Valentines Day Dinner - surf & turf at home


For our Valentines Day, I wanted to cook a special meal at home, consisting of surf (lobster tail) and turf (ribeye steak), mashed potatoes, asparagus, and chocolate dipped strawberries for dinner.
(and an extra bowl of fresh strawberries for Jeff, since he prefers his strawberries chocolate-free... what a weirdo...  ^_^).


Although the price to make this meal for 2 is, literally, a fraction of the cost of what it would cost us at a restaurant (folks, this is why eating out can really put a dent in your wallet), the total bill for all the ingredients still came out to $25, which is around the cost of 1 week's worth of groceries (maybe even more)!!
This is why normally, I would not make meals like this at home.
But since Valentines rolls around once a year, sure, why not splurge.  =)

Making each dish was actually VERY easy, and I made everything in under 30 minutes.  Yet for some reason, when people see this meal, they seem to think its very elaborate! 
I'm not a fan of time consuming, elaborate things. 

How I made the steak:
I bought two rib eye steaks (at $5.99/lb.  Each steak was about $4.50).
Preheat oven to 500 degrees, and warm up cast iron skillet in the oven.
Sprinkle salt, pepper, grill season ing on both sides of the steak, and drizzle with canola oil.
Place cast iron skillet on the stove on high heat, and sear both sides of the steak for 2 minutes per side.
Place the cast iron skillet (with steaks in them) into the oven, and cook for an additional 30 seconds per side.  (this is for medium rare.  Increase time to 1 min per side if you want medium).
Remove the steak from the cast iron skillet and let it rest on a plate so the juices can redistribute.
All done!


How I made the lobster tail:
I bought two 5oz lobster tails (at $6 per tail)
Butterfly the lobster tails.  Forgot how to do this?  Read my post about it here.
Preheat oven to 450 degrees.
Bake the lobster tails for about 13 minutes.
Serve with a pat of butter on top.
All done!


How I made the mashed potatoes:
I bought a 3 pound bag of ruby gold potatoes (for $1/bag).
Chop and boil 4 large potatoes until its cooked.  I like to leave the skin on.
Drain the potatoes and return the potatoes to the hot pot.
Melt in half a stick of butter and pour in a splash of skim milk, add in salt and pepper. 
Mash with a potato masher.
If you prefer the potatoes more wet, add in another splash of milk.
You don't need gravy.  The butter and salt and pepper is flavorful enough.
All done! 


How I made the asparagus:
I bought 1 pound of asparagus (for $1/lb).
Break the woody base off and discard, or peel the base of the asparagus using a veggie peeler
Rinse the asparagus, and place onto a baking sheet.
Drizzle asparagus with olive oil, salt, and pepper.
Place asparagus into the oven at 425 degrees for 15-18 minutes.  (I actually roasted them at the same time with the lobster tail at 450 degrees and decreased the cooking time by a couple of minutes).
All done!


How I made the chocolate covered strawberries:
I bought two 16oz boxes of strawberries (at $1.50/box)
Melt half a bag of chocolate chips  in a microwave safe bowl, in the microwave.  I microwaved for 1 minute, stirred, microwave for another minute, stir again, until it is completely melted.
Dip the strawberries into the melted chocolate, and place onto a sheet of wax paper.
Place strawberries in the fridge for 30 minutes, or until the chocolate is hardened.
All done!

Everything was so easy!