Wednesday, September 26, 2007

Sweet Marinated Chicken

I love Asian food. My favorite cuisine of choice. And I also like eating everything with a bowl of steaming hot white rice. Especially hot cheetos with my white rice. Mmm Mmm Mmm.

Where was I?

Oh yea, I love Asian food, which is why I like marinating my chicken meat with any Asian ingredient I could get my hands on.

I know that adding sugar to your meat, causes the meat to burn while cooking, and causing the sugars to burn and stick on your pan.
But I love my meat sweet, so it's totally worth it!

Sweet Marinated Chicken

Ingredients:
1 tbsp soy sauce
2 tbsp oyster sauce
1 tbsp brown sugar
1 tsp white sugar
2 cloves of garlic minced
1 small piece of garlic, minced
1.5 pounds of chicken

Instructions:
1. Defat and debone your chicken (choice of meat is up to you. I used chicken thighs).
2. Save the chicken bones for later, to be used in making chicken broth in soup.
3. Mix all ingredients together (chicken + seasonings)
4. Let chicken marinate over night. I left mine marinate for about... oh 4-5 days..... =/


Cooking:
5. Heat up pan with oil.
6. Set chicken down to cook.
7. Turn chicken over when chicken turns golden brown.


8. When both sides are golden-brown, remove from heat.
9. Serve!

Tuesday, September 25, 2007

Mexican Cupcakes for Jeff's Birthday

So this recipe post is wayy behind!
I made cupcakes for Jeff's birthday, which was Sept 14, and I am posting the recipe on on the 25th...
ok, I'm not that far behind!

So Grace lent me this Mexican cake recipe of hers (thanks!), since I wanted to try a new form of chocolate cake!
Of course, Jeff likes his cake in cupcake form, so I poured the cake batter into cupcake paper. and the cupcakes came out very.... unique.
Mexican cupcakes have more of a spice flavor, rather than the milk chocolate flavor my taste buds are accustomed to.

So if you like chocolate with a spice/cinnamon-y flavor, this is a recipe to try:

Mexican Chocolate Cake/Cupcake

Ingredients:

3 disks of Mexican chocolate, chopped
2 oz of unsweetened chocolate, chopped (I cheated and used semi- sweet!)
2 cups flour
1 1/2 tsp baking powder
1/4 tsp salt
1/2 tsp cinnamon
1 1/2 sticks of butter
1 cup sugar
3 eggs (separated)
2 tsp vanilla extract
1 1/2 cups milk

Instructions

1. Chop up the Mexican chocolate. It was hard work! phew!


2. Add the unsweetened/semi sweet choclate to Mexican chocolate

3. In a separate bowl, pour in the flour


4. Add baking powder, salt and cinnamon with the flour.


5. Gather the remainder of your ingredients! Yea. That's a good idea...


6. Separate your eggs. I separate eggs by transferring the egg yolk from one shell to another, then letting the egg white drip into a bowl, in the process.


7. The eggs are separated! (whites on the left, yolks on the right)


8. Melt the chocolates. I melted my chocolate by immersing the chocolate bowl in a hot pot of boiling water, and covering the pot.


9. In a separate bowl, cream the butter and sugar together.


11. Add in melted chocolate and mix well. Yum?


13. Add in flour mixture and milk, alternating. Mix well. Add in 1/3 of egg whites.

14. All mixed!


15. Beat egg whites til stuff, then fold in remaining egg whites.

16. Preheat oven to 350 F.

17. Line up cupcake cups, and fill cups 3/4 full with batter. Put into oven.


25- 30 minutes later.....

18. Cupcakes are done baking!!


19. Frost the cupcakes.


20. Birthday boy and his cupcakes!

Wednesday, September 12, 2007

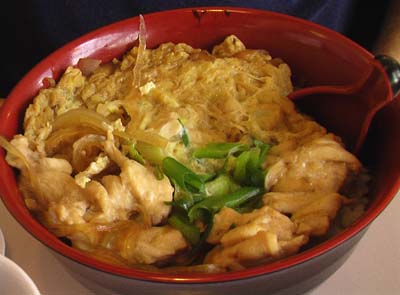
Chicken & Egg Donburi

Last night, I was trying to follow a recipe that I ripped off a Nishiki rice bag, for chicken donburi.

However, while reading the recipe, I just did not agree with some of their ingredients or proportions.

Yea....
I have a hard time following directions, both in cooking and other aspects of life...
I just gotta do things my own way...

btw, no pictures today!
Sorry. I felt ill while I was cooking dinner. I just wanted to get in and out of the kitchen quickly.


Chicken & Egg Donburi (Oyako Donburi)


Ingredients

4 chicken thigh meat (around 1 lb of meat?)
2 cups water
3 eggs, beaten
2 stalks of green onion, chopped
2 tbsp soy sauce
1 tbsp oyster sauce*
1 medium onion, thinly sliced

* you can also add more soy sauce and some brown sugar instead of using oyster sauce

Instructions

1. Defat chicken thigh meat.
2. Heat up a small drop of oil in a skillet, and throw chicken meat in. Stir.
3. Throw in onion, water, soy sauce, and oyster sauce.
4. Let simmer for about 5 minutes.
5. Skim off any foam off the top.
6. Mix beaten eggs and green onions.
7. Pour egg mixture evenly over the chicken mixture. Do not stir.
8. Let the food simmer for another 5 minutes.
9. Serve by scooping the chicken mixture over a bowl of rice. Don't forget to pour some of the gravy over the rice also.


Not my own photo, but this is how chicken donburi typically looks:

Daikon Soup

Daikon... White Carrot.... Turnip,
I have heard all types of names and variations for this mystery root/vegetable.

But whatever it is, they make really good soup!

Daikon Soup

Ingredients
1 medium daikon (about 2 pounds?)
5 cups water
4 chicken leg bones (for broth)
2 tsp salt
1 tsp black pepper


Instructions:

1. Wash daikon root, and peel off the outer skin.


2. Cut up daikon


3. Make chicken broth: place chicken bones in water, and boil for about 5 minutes.
4. Scoop off any foam
5. Throw in chopped daikon.
6. Let daikon boil, then turn the flame down, to a slow simmer.
7. Put in salt and pepper. Add more to taste.
8. Let daikon simmer for about 20 minutes, or until desired tenderness.
9. Serve! Careful, it's still hot!

Wednesday, September 5, 2007

Salty Steamed Chicken REVISED

GAH. I have been so behind on posting my recipes!
But it seems like every time I post 1 entry, that takes about 30-1 hour... I have no idea why I take so long...

So today's recipe, is actually a revised version of a previous dish I made:
"Steamed Chicken"
, which was posted on August 16, 2007.

I was not thoroughly satisfied with my original attempt at the dish.
So I made some revisions and I tried again.
And I am GLAD that I tried again, because this time, it tasted so much better!

( some changes I have made was:
I used a whole chicken, I upped the amount of salt used, I left the salt sink into the chicken overnight, I added cinnamon and black pepper to the chicken, and I added minced garlic )


Salty Steamed Chicken (REVISED)

Ingredients:
- 1 whole chicken (about 3 pounds)
- 2 stalks of green onion (sliced)
- 2.5 tbsp salt
- 1 tsp sugar
- 1 pinch of cinnamon
- 1/4 tsp black pepper
- 10-15 fresh slices of ginger
- 2-3 cloves of garlic (smashed/minced)

Instructions
*note* preparing the chicken requires 2 days! so this isn't exactly a last minute meal-deal here!

1. Wash whole chicken and remove giblets
2. Cut butt cheek fat off chicken and discard
3. Towel dry the fowl. Rub salt and sugar all over the chicken, under the skin, on the skin, inside the cavity... everywhere!
4. Wrap chicken in a bag or saran wrap, and let chicken sit in the fridge over night. This allows the salt on the chicken to sink into the meat.
5. The following day.....
6. In a small bowl, combine the minced garlic, cinnamon, and black pepper.
7. Rub garlic mixture all over the chicken. Yes... under the skin, on the skin, inside the cavity... everywhere!
8. Lay sliced ginger and green overs on top of the chicken, under the skin, and inside the cavity, also.
9. Set chicken in steamer.
10. After the water boils, let the chicken steam for about 55 minutes to 1 hour.
11. Chicken is done when the meat no longer bleeds, and the skin pulls away from the bone.


Photos!:


Raw Chicken. All done marinating, ready to be steamed.


Chicken, done steaming!
Notice, how the skin pulls away from the bone, on the legs. this usually is an indicator that the chicken is done!


Me removing the chicken from the steamer!


Whole chicken on a plate.


Chop up the chicken!
Sorry.... I wish I knew how to cut chicken better.....

Thursday, August 30, 2007

Hot Garlic-Buttered Asparagus

I love Asparagus.

Too bad I do not cook them more often, since finding fresh, tender asparagus at a reasonable price, is very difficult.

On my way home from work yesterday, I stopped by the store to pick up some bread, and birthday candles, and horrah! there was asparagus sitting there!

Unfortunately, because I got off work a little late yesterday, the post-work shopping crowd came and left and took all the good asparagus. =(
Shifting through the remains, I found a decent bunch, and carried the poor reject home.

Hot Garlic-Buttered Asparagus

Ingredients
- 1 small bunch of asparagus (it was pre-bunched by the store, so I am unsure how much it weighed... 0.5 pounds - 1 pound?)
- 1 tbsp of butter
- 1 garlic clove (minced)
- 1/2 tsp salt
- 1/2 tsp pepper

(salt and pepper amount can be increased or decreased based on personal preference)

Instructions
1. Wash the asparagus then cut about 0.5-1 inch off the base of each asparagus. The base is too tough to eat.
2. Peel the outer skin off the bottom of your trimmed asparagus. This skin is fibrous, but is just way too hard for my teeth to handle.
3. Boil enough water to submerge the asparagus. Boil the asparagus for about 5 minutes, or until fully cooked.


4. When the asparagus is done boiling, remove the asparagus and set aside. Dump water out.
5. Place butter in heated skillet
6. When butter is melted, toss in minced garlic and saute until golden
7. Place asparagus into skillet, until asparagus is evenly coated with butter and garlic


8. Toss in salt and pepper, and turn the asparagus until the salt and pepper is evenly distributed.
9. When asparagus is at your desired tenderness and flavor, then the asparagus is done!


Here is my asparagus!


It was quite delicious, tender, and tasty.


CLOSE-UP PAPARAZZI PHOTO!

Saturday, August 25, 2007

Steamed Live Rock Crabs

I went to the Asian supermarket "Ranch 99" today (or is it "99 Ranch"??) and I bought 2 large Live Rock Crabs !!

They looked small when Jeff and I picked the crab out of the water tank,
bigger when we stuffed the crabs into plastic bags,
and gigantic when we took the crabs home and opened up the bags!!

I was so excited over eating fresh crabs, that I went camera crazy today.
Look how gigantic these beauties are!


The crab with his giant claws, and me with my perfectly manicured claws, uh I mean, nails.

------------------------------------------------------------------------------------------------------------


The crab is bigger than my head! (He looked much smaller at the store)

------------------------------------------------------------------------------------------------------------


Jeff's crab is humongous too!
------------------------------------------------------------------------------------------------------------

Steamed Rock Crabs (with dumplings on the side)
*note*
I do not recommend boiling crabs and dumplings because all their flavors just run into the boiling water, and all you're left with is soaking wet, flavorless, crab and dumplings.
So unless you plan on drinking the boiled water,
I recommend
steaming your crabs of dumplings instead.

Ingredients:
- 2 Crabs (or as many crabs as you want that fits in your steamer)
- 1 Steamer!

Instructions:
1. Wash the crabs clean

2. Pose and take a lot of pretty photos with the crabs

3. Place crabs in the steamer. Fill steamer up with water and turn on stove on high.


hi-yah! Mortal Kombat Crabs!
(notice their interlocking claws)

------------------------------------------------------------------------------------------------------------


Mortal Kombat crabs, ready to be steamed! Hi-yah!
------------------------------------------------------------------------------------------------------------

Because I was using my 3 tiered steamer, but the crabs only occupied the middle tier,
I decided to put the top tier to use, by throwing some Asian dumplings !


------------------------------------------------------------------------------------------------------------
4. Before placing dumplings into steamer, be sure to oil the bottom of the steamer, to prevent the fragile dumpling skin from sticking to the steamer.

5. Cover the steamer!


6. After the water boils, turn the heat down to a medium, and steam for about 15-20 minutes.

7. The dumplings are ready!


8. Let's take a peek at the steaming crabs. Yum! Steaming hot!


9. Bright orange, hot, and freshly steamed crabs on a platter


How To Serve The Crabs:


The wonderful thing about eating crabs, is that they have their own natural seafoody flavor, so eating the crabs plain is always a delicious option.

Of course, crabs can always be eaten with dips and sauces such as:

Lime juice + Salt
1. Squeeze the juice out of some limes
2. Pour a pile of salt in the middle of the lime juice.
3. Serve lime juice in a dipping bowl


Hot Butter dip (not for the health conscious)
1. Melt butter on low heat over the stove.
2. Place butter in a dipping bowl
3. Dip crab meat into butter, or use a brush to lightly brush your crab with butter.


and now..... my all time favorite dip: .....
Crab Brain+Gut Dip
1. Crabs come with crab goo, located right under the shell of the crab. It's green and white and tastes so good.
2. This "crab goo" is naturally flavored, somewhat salty (from living in the salty sea!).
3. When you remove the crab shell from the body of the crab, turn the shell over and mix the goo. Dip your crab meat in this goo.
4. Not only does the crab supply his own flesh for your consuming entertainment, but the crab also supplies the dip for you too!


And here's Jeff, happily enjoying the crab, with the Crab Gut Dip!! (next to his left hand)


YUMMY!

Picking out crabs, cooking crabs, de-shelling the crab, and eating the crab, makes both: a very fun meal and a really fun afternoon activity!!

Pan Fried Pompano Fish

I love Asian pan fried fish! I wish I had fish more often, but it's so hard when there is not Asian super maket nearby.

I luckily was able to buy some pompano fish recently, so I was quite happy. They taste good and are relatively cheap!

Pan Fried Pompano

Ingredients
- 2 Pompano fishes
- 6 thin slices of Ginger Root
- 1/4 tsp of salt
- 1 - 1.5 tbsp soy sauce
- 1/4 cup water
- 2 tsp oil

Preparation:
1. If the fish is not already gutted, gut the fish.
2. You gut fish by first cutting right under the fish's head. Then make an incision from underneath the head, down to the fish's belly. Yank out the innards and guts, and wash clean.
3. When fish is cleaned, rub salt all over the outside and inside of the fish.
4. Lay sliced ginger both outside and inside the fish.

Here is my prepared fish (still raw):


Cooking Instructions:
5. Place oil in skillet. When oil is hot, lay the fish into the skillet and cover.
6. When the fish is done cooking on one side (about 5 minutes on high heat), turn the fish over, being careful not the tear the thin fish skin. (Add more oil if you're having trouble).
7. Turn the fish over and cook until that side of the fish is cooked (about another 5 minutes or so). Cover or don't cover, your preference.
8. Pour soy sauce into skillet, then pour in water, making this gravy.
9. Turn fish over until both sides of the fish are coated in the gravy.
10. When the gravy thickens, the fish is done!

Here is my finished masterpiece. Mmm.: